we just got back from visiting family in california. we went from a wet 2 degrees up to a solid 70 with sunshine. it was glorious. for maybe the first time my loyalty to the PNW wavered just a bit. especially once i bit into the juiciest, sweetest grapefruit fresh from a tree. yuuuummmm. i could live life down there.
a group of us ventured out to universal studios and fulfilled our lifelong dream of visiting hogwarts! just for a well balanced day, i faced my *worst* nightmares going through the walking dead attraction. they actually make you walk through and it is terrifying, but not as terrifying as when you get fake attacked by someone in your own group once you think you’re safe. i scream loud.
all in all it was good fun and then we went out for tacos.
there is a little taco place near the fam’s place that everyone is obsessed with. that taco place, they PILE on the guacamole and they are just overflowing with all the meat and salsa. in a totally uncharacteristic move, i didn’t take any pictures!
when we got back home i couldn’t get tacos out of my head! i found the recipe for pork adovada from The Food Lab. i used two versions of dried new mexico chilies (normal? and spicy) because that’s what i could find at the store. this makes a super saucy pot of spicy, fall apart pork. perfect in a corn tortilla, or on a pile of greens.
my mom always told me to ring in the new year the way that you want the whole year to go. given that last year was a combo of waaaaay too much champagne + bathroom floor, i decided to listen to my mom’s advice and rang in the new year with the people i love best and staying hydrated. i rolled out of bed feeling great and like i’ve gotten a great head start on the obligatory new year’s resolutions list.
cook more meals!! i’m very lucky to live in a great city with a million great places to eat/drink. at the end of the day it is hard to get my shit together and not order pizza every night. sub-resolution: use my slow cooker and stop thinking that the only meals worth cooking have to be feast worthy.
stay positive-i am a stress puppy and i have a high stress job. there are not enough bath bombs in the world sometimes. i want to work on purposefully managing stress with exercise and reflection to keep myself in check. i have so much to be happy about.
marie kondo it up-i’ve only made it through the first chapter, but i need this in my closet, my spare bedroom, my kitchen…bonus points, will probably help with resolution #2
basically, be an adult and feed myself. don’t be such a downer because it’s all first world problems, and clean up my space.
as an anti-nye diet statement, here is the cheesiest baked spinach dip that i made last night for all my friends.
Baked Spinach Dip
Ingredients
2 pkgs cream cheese, at room temperature
8 oz grated parmesan, divided
8 oz ricotta cheese
1 cup grated mozerella
1 cup mayonnaise
1 bunch (about 5-6) green onions, chopped
2 lbs frozen chopped spinach, defrosted and squeezed dry
1/2 cup canned diced jalapeños
2 TBSP garlic powder
1 TBSP salt, to taste
Preheat the oven to 400°F. Fitted with the paddle attachment, mix the cheeses, about 3/4 of the parmesan, and mayo together until fully incorporated. Add the chopped onions, chiles, spinach, mix. Add garlic powder and salt, to taste. You can eat as is, but melty, cheesy dip is 1000x better.
Move the dip to a heatproof dish (pie pan or cast iron pan works great) and sprinkle the remaining shredded parm on top. Bake for about 25 minutes, or until golden bubbly.
Note: If you like your dips extra spicy or love garlic, feel free to dump in more peppers or garlic.
One of the *hardest* things about living in an apartment with a little pup is having to bundle up a half dozen times a day for bathroom trips. I crave hot tea and soup in my life so much more now that I can’t hide under blankets for days at a time. This cutie’s face is absolutely worth it:
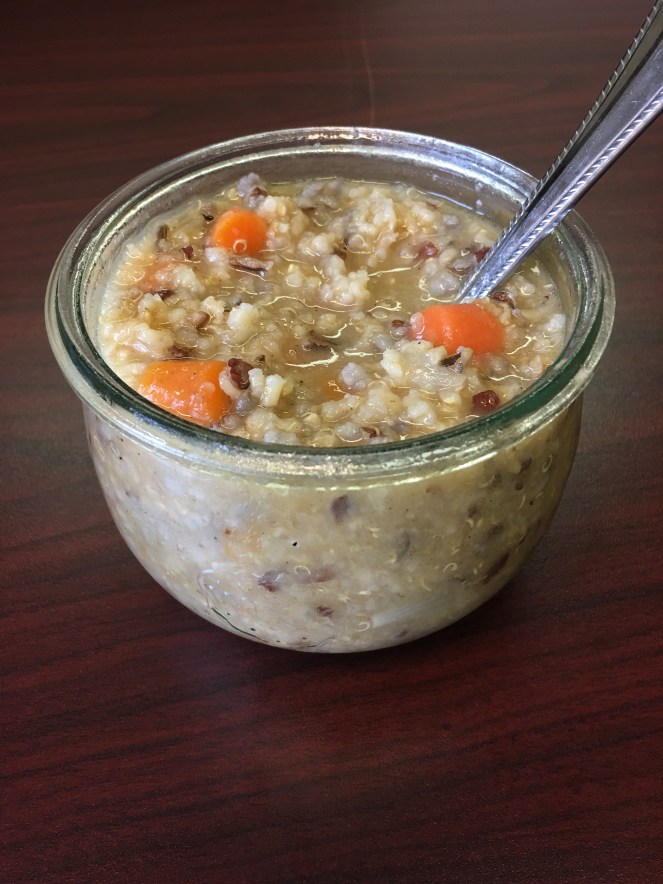
I just happened to have a couple of ducks worth of bones from duck confit, and I LOVE how this turned out.
Ingredients
2 duck’s worth of bones
2 sweet onions, quartered
2 heads of garlic, cut in half
4 carrots, rough chopped
1 bunch of celery, rough chopped
2 cups of Quinoa/Wild rice (note that this makes a very thick soup, add less if desired)
3 dried bay leafs
1 tsp dried rosemary
drizzle of olive oil
1/2 sweet onion, diced
1 carrot, diced
1/3 cup whiskey
salt
pepper
Directions: Add the duck bones, onions, garlic, carrots, and celery to a large stockpot. Add just enough water to cover the contents of the pot. Bring to a boil. Reduce heat to low, and skim foam and excess fat that floats to the top. Simmer for 2 hours. Add the bay leaf, rosemary, simmer for 20 more minutes. Strain the solids from the broth.
Add olive oil to the stock pot and sauté the onions until translucent. Add the diced carrots. Deglaze the pot with whiskey and scrape up any tasty bits with a wooden spoon. Pour the broth back into the stockpot, add salt and pepper to taste. Bring to a boil and add the Quinoa and/or wild rice. Boil until grains are tender. Adjust seasoning, if necessary.
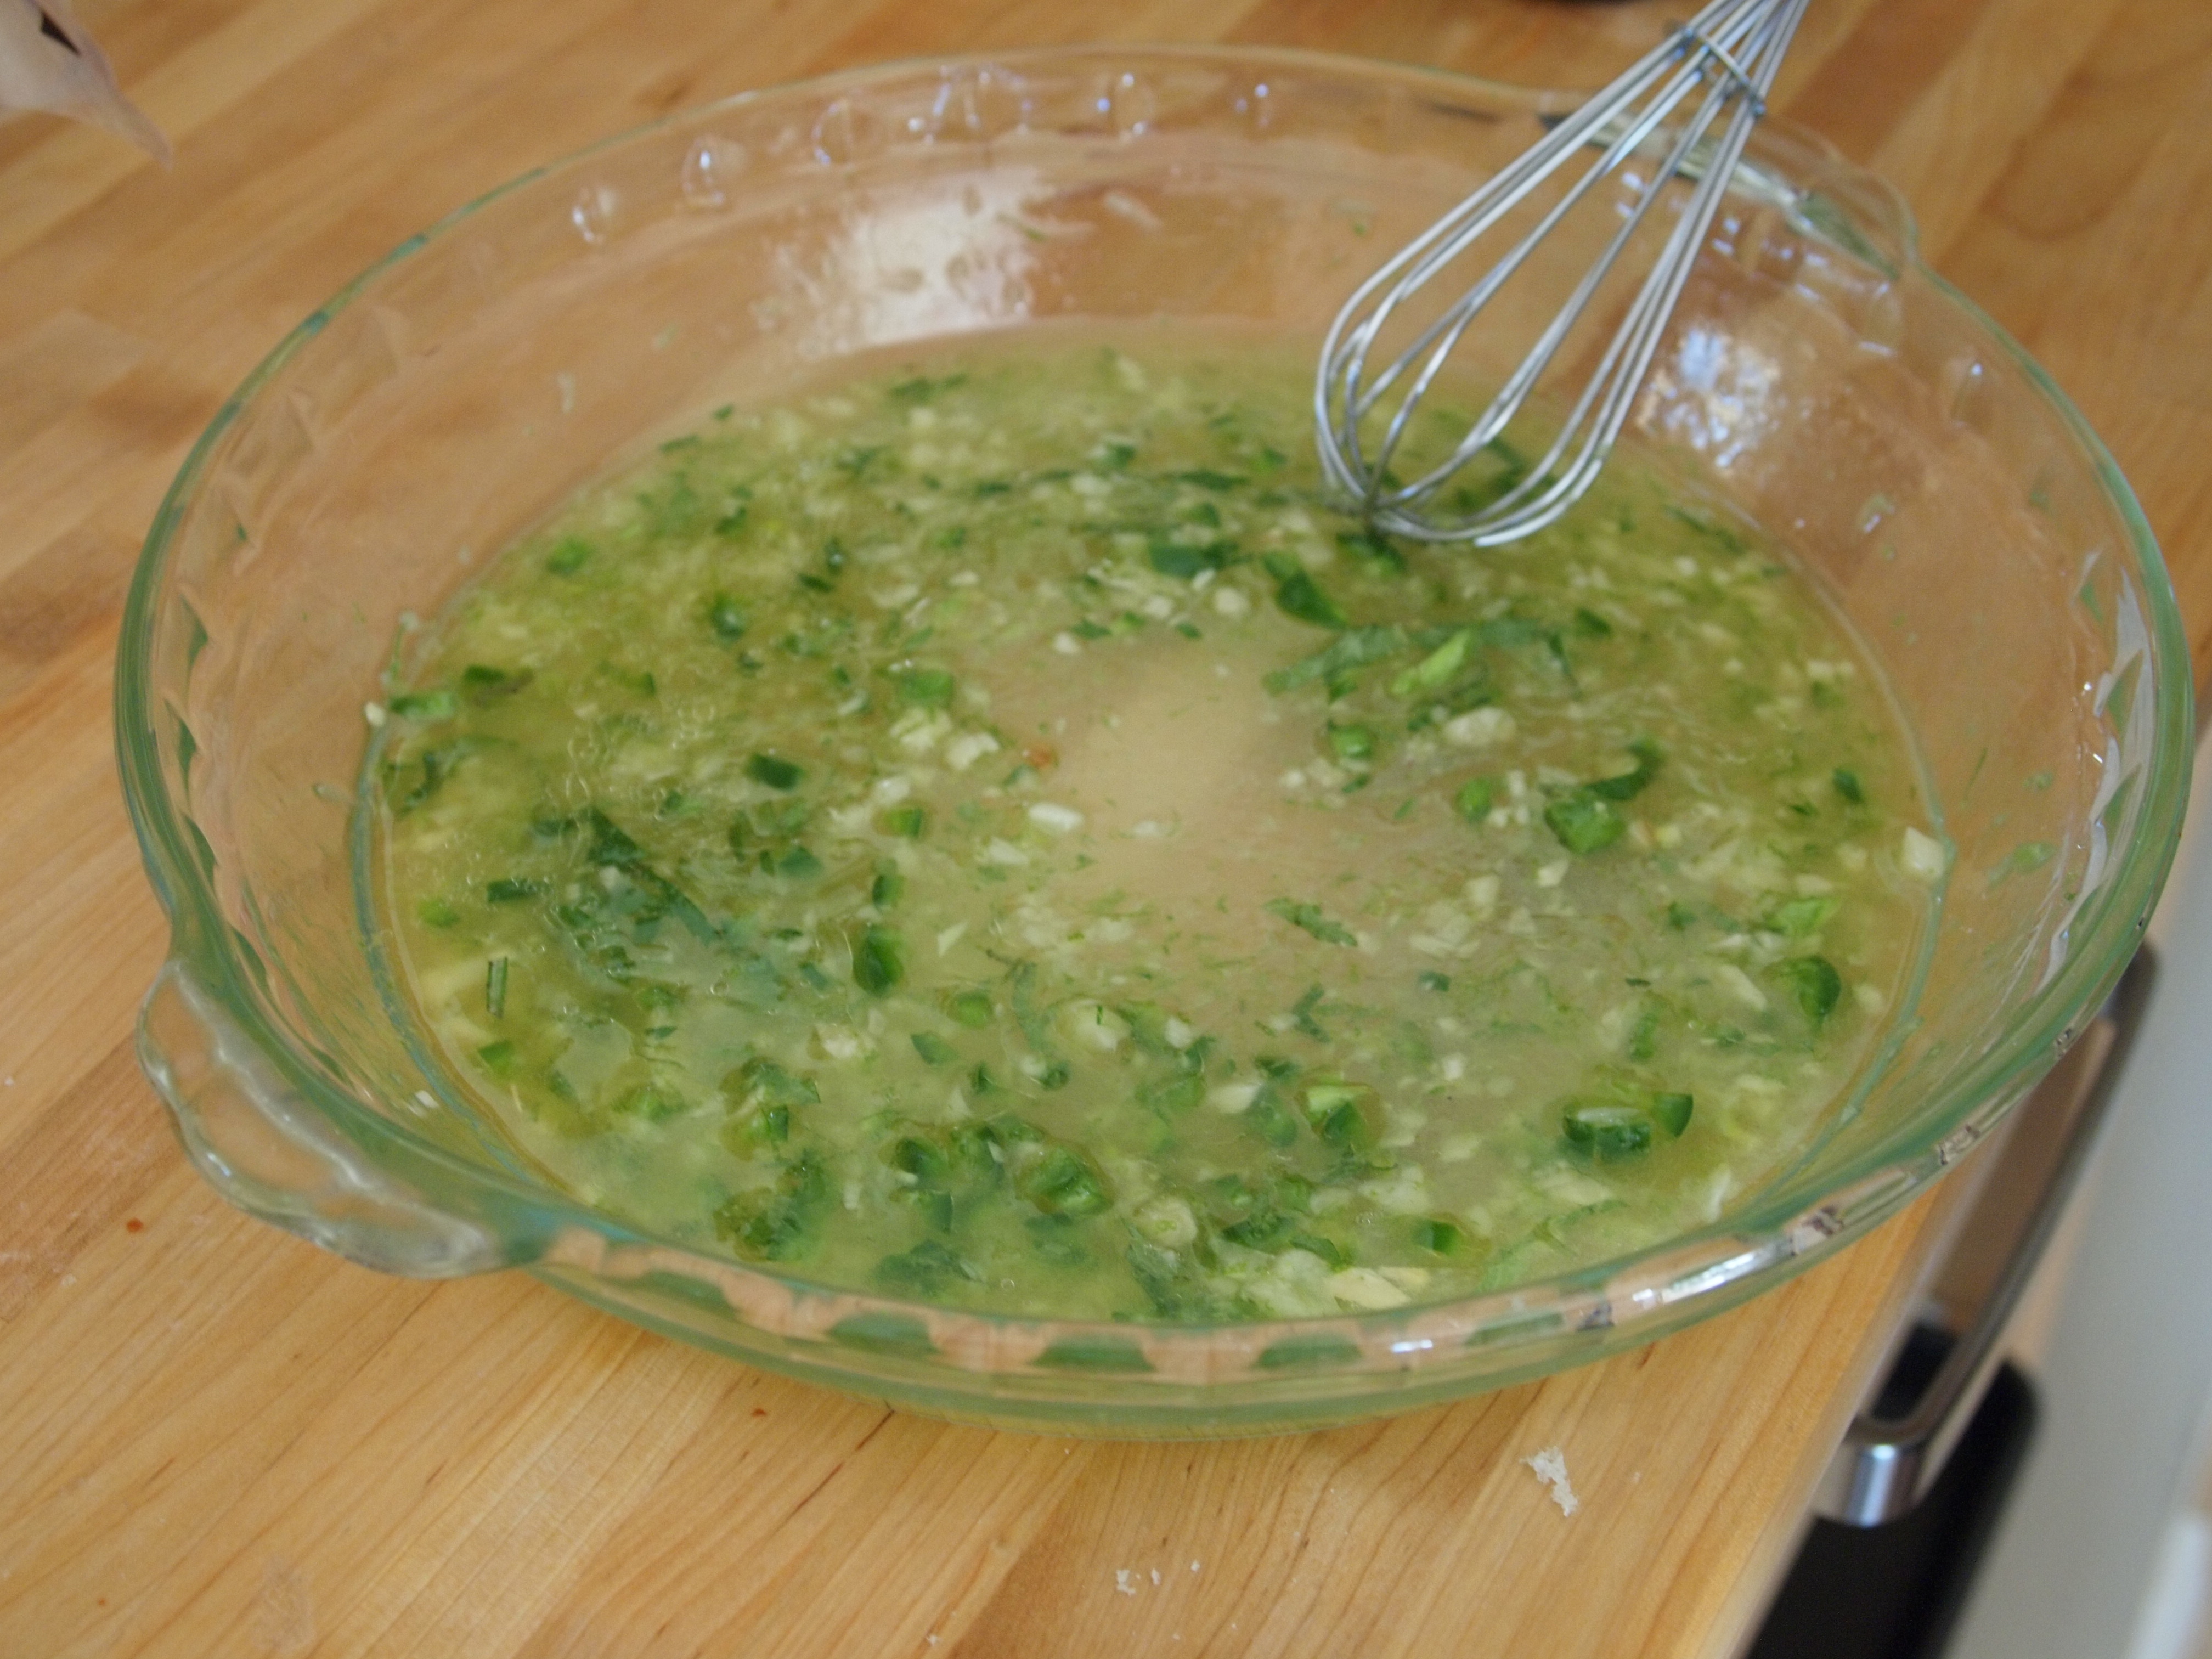
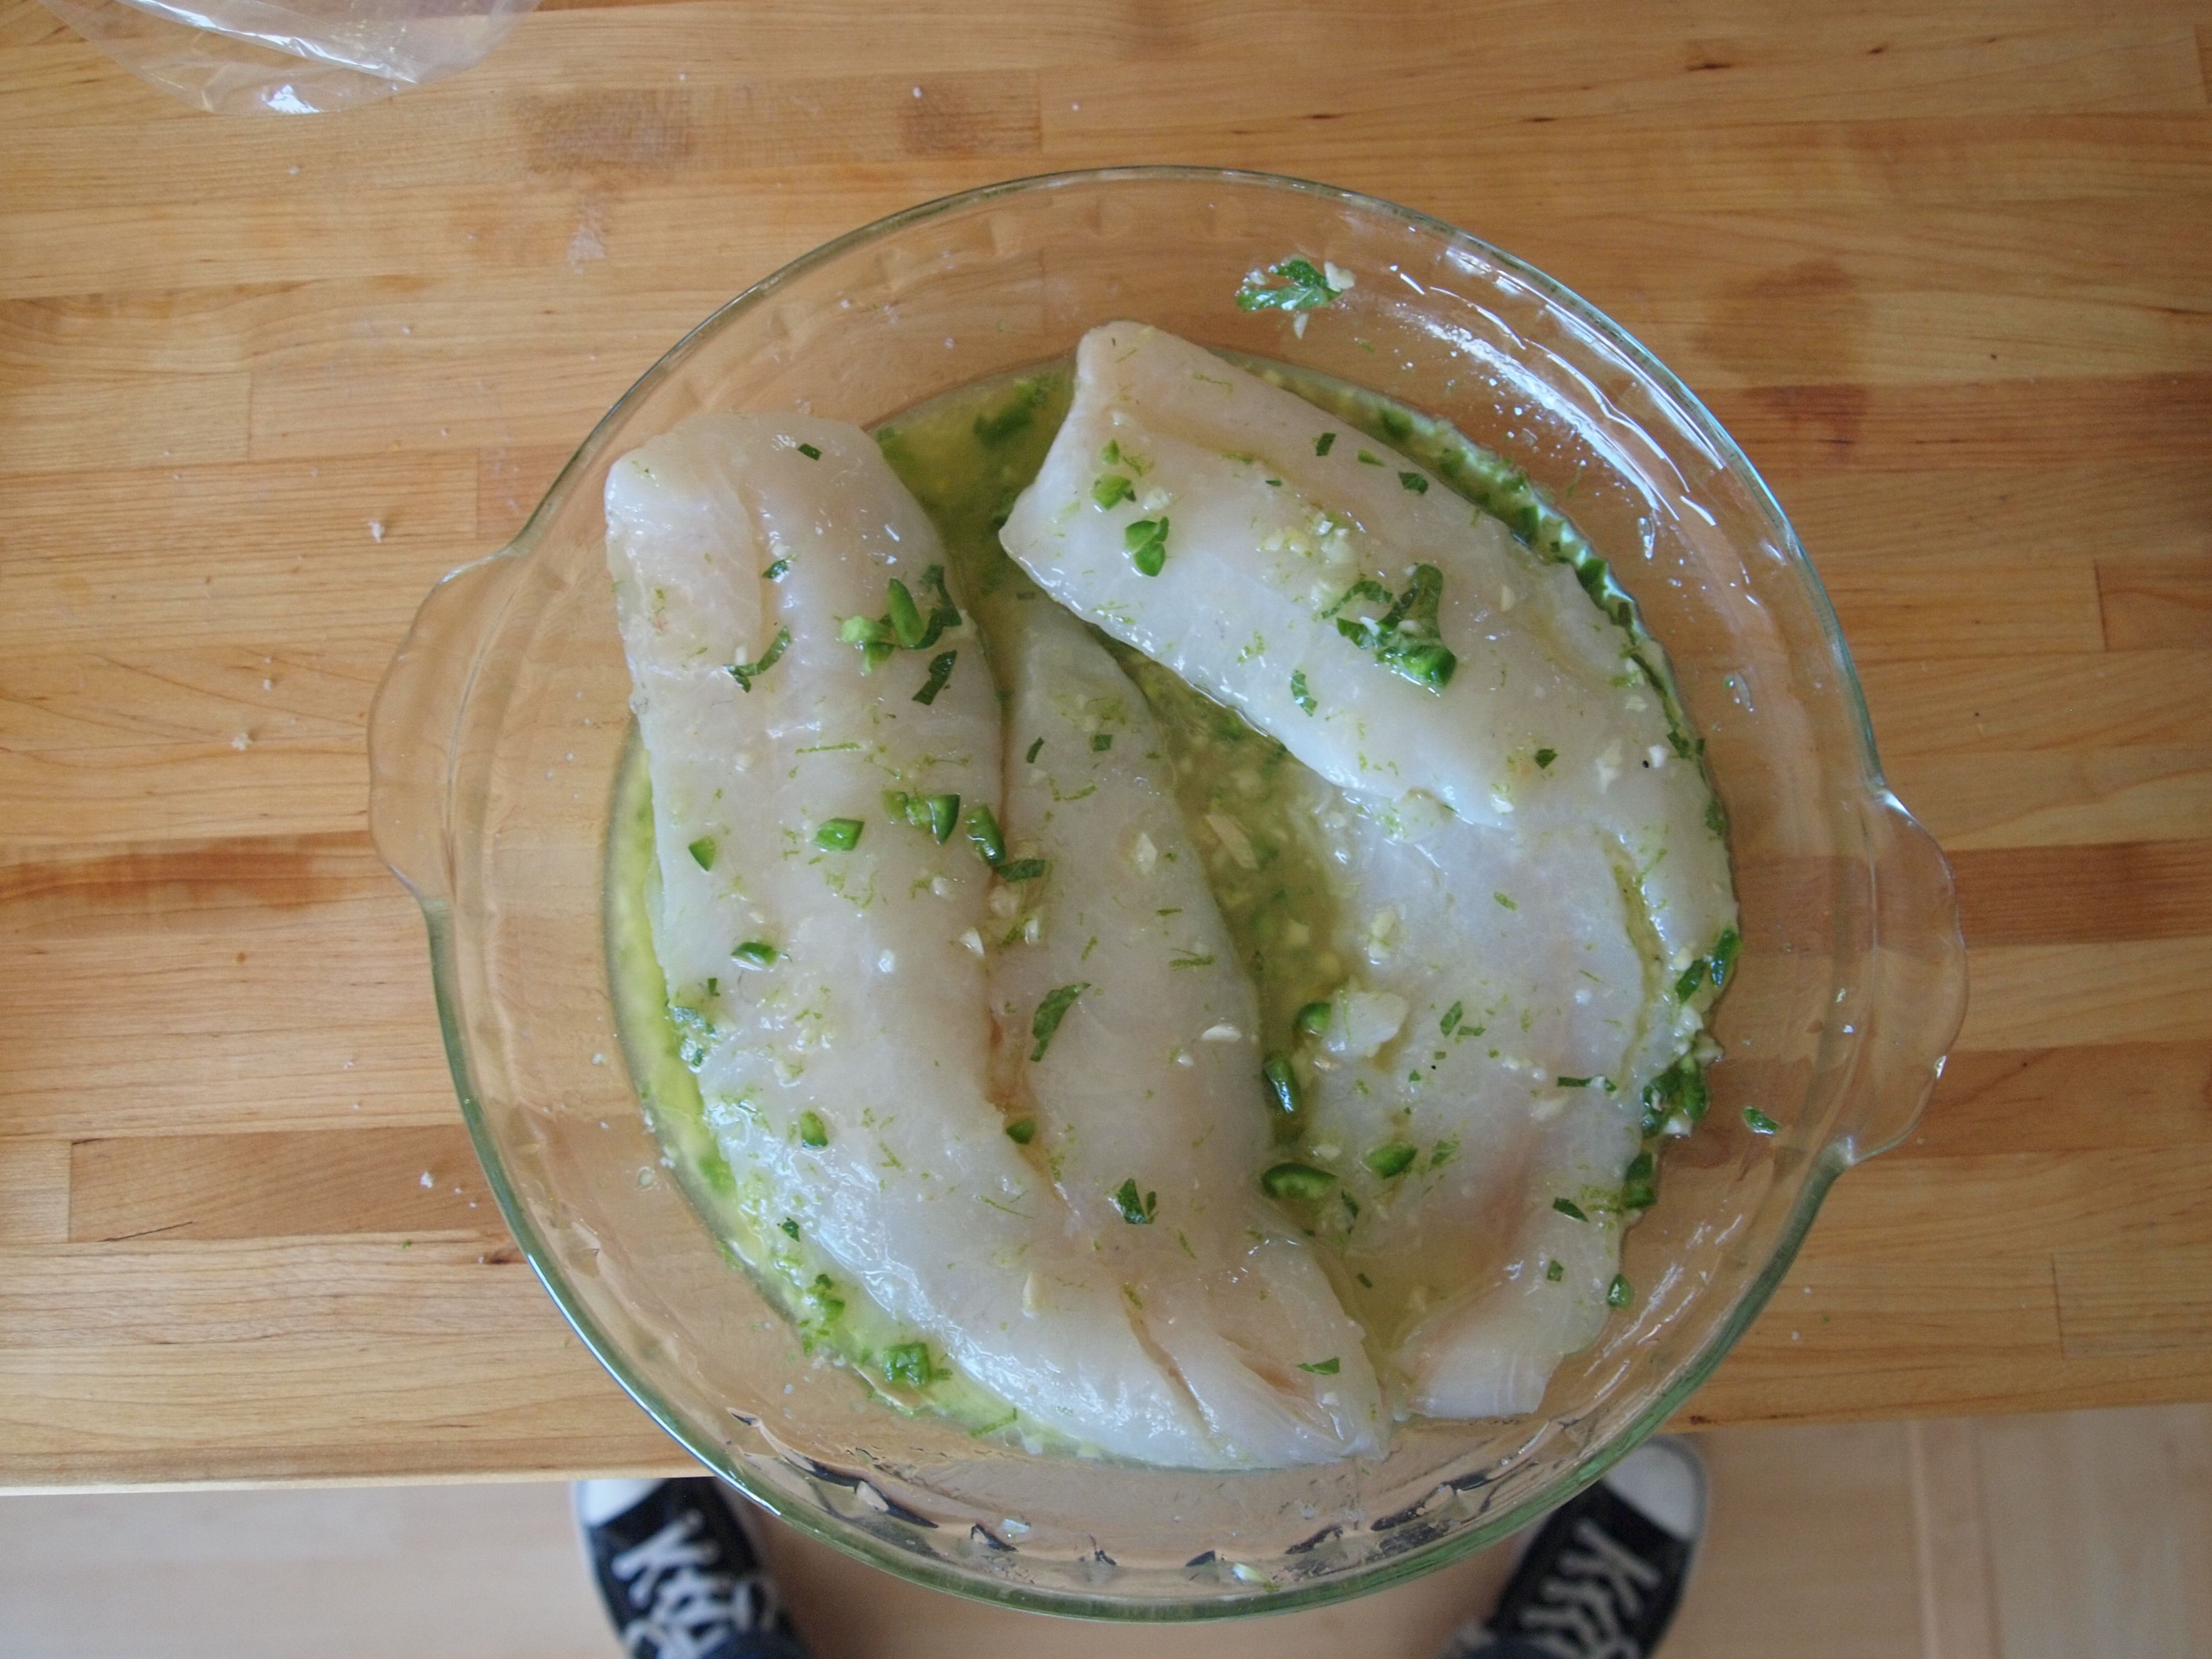
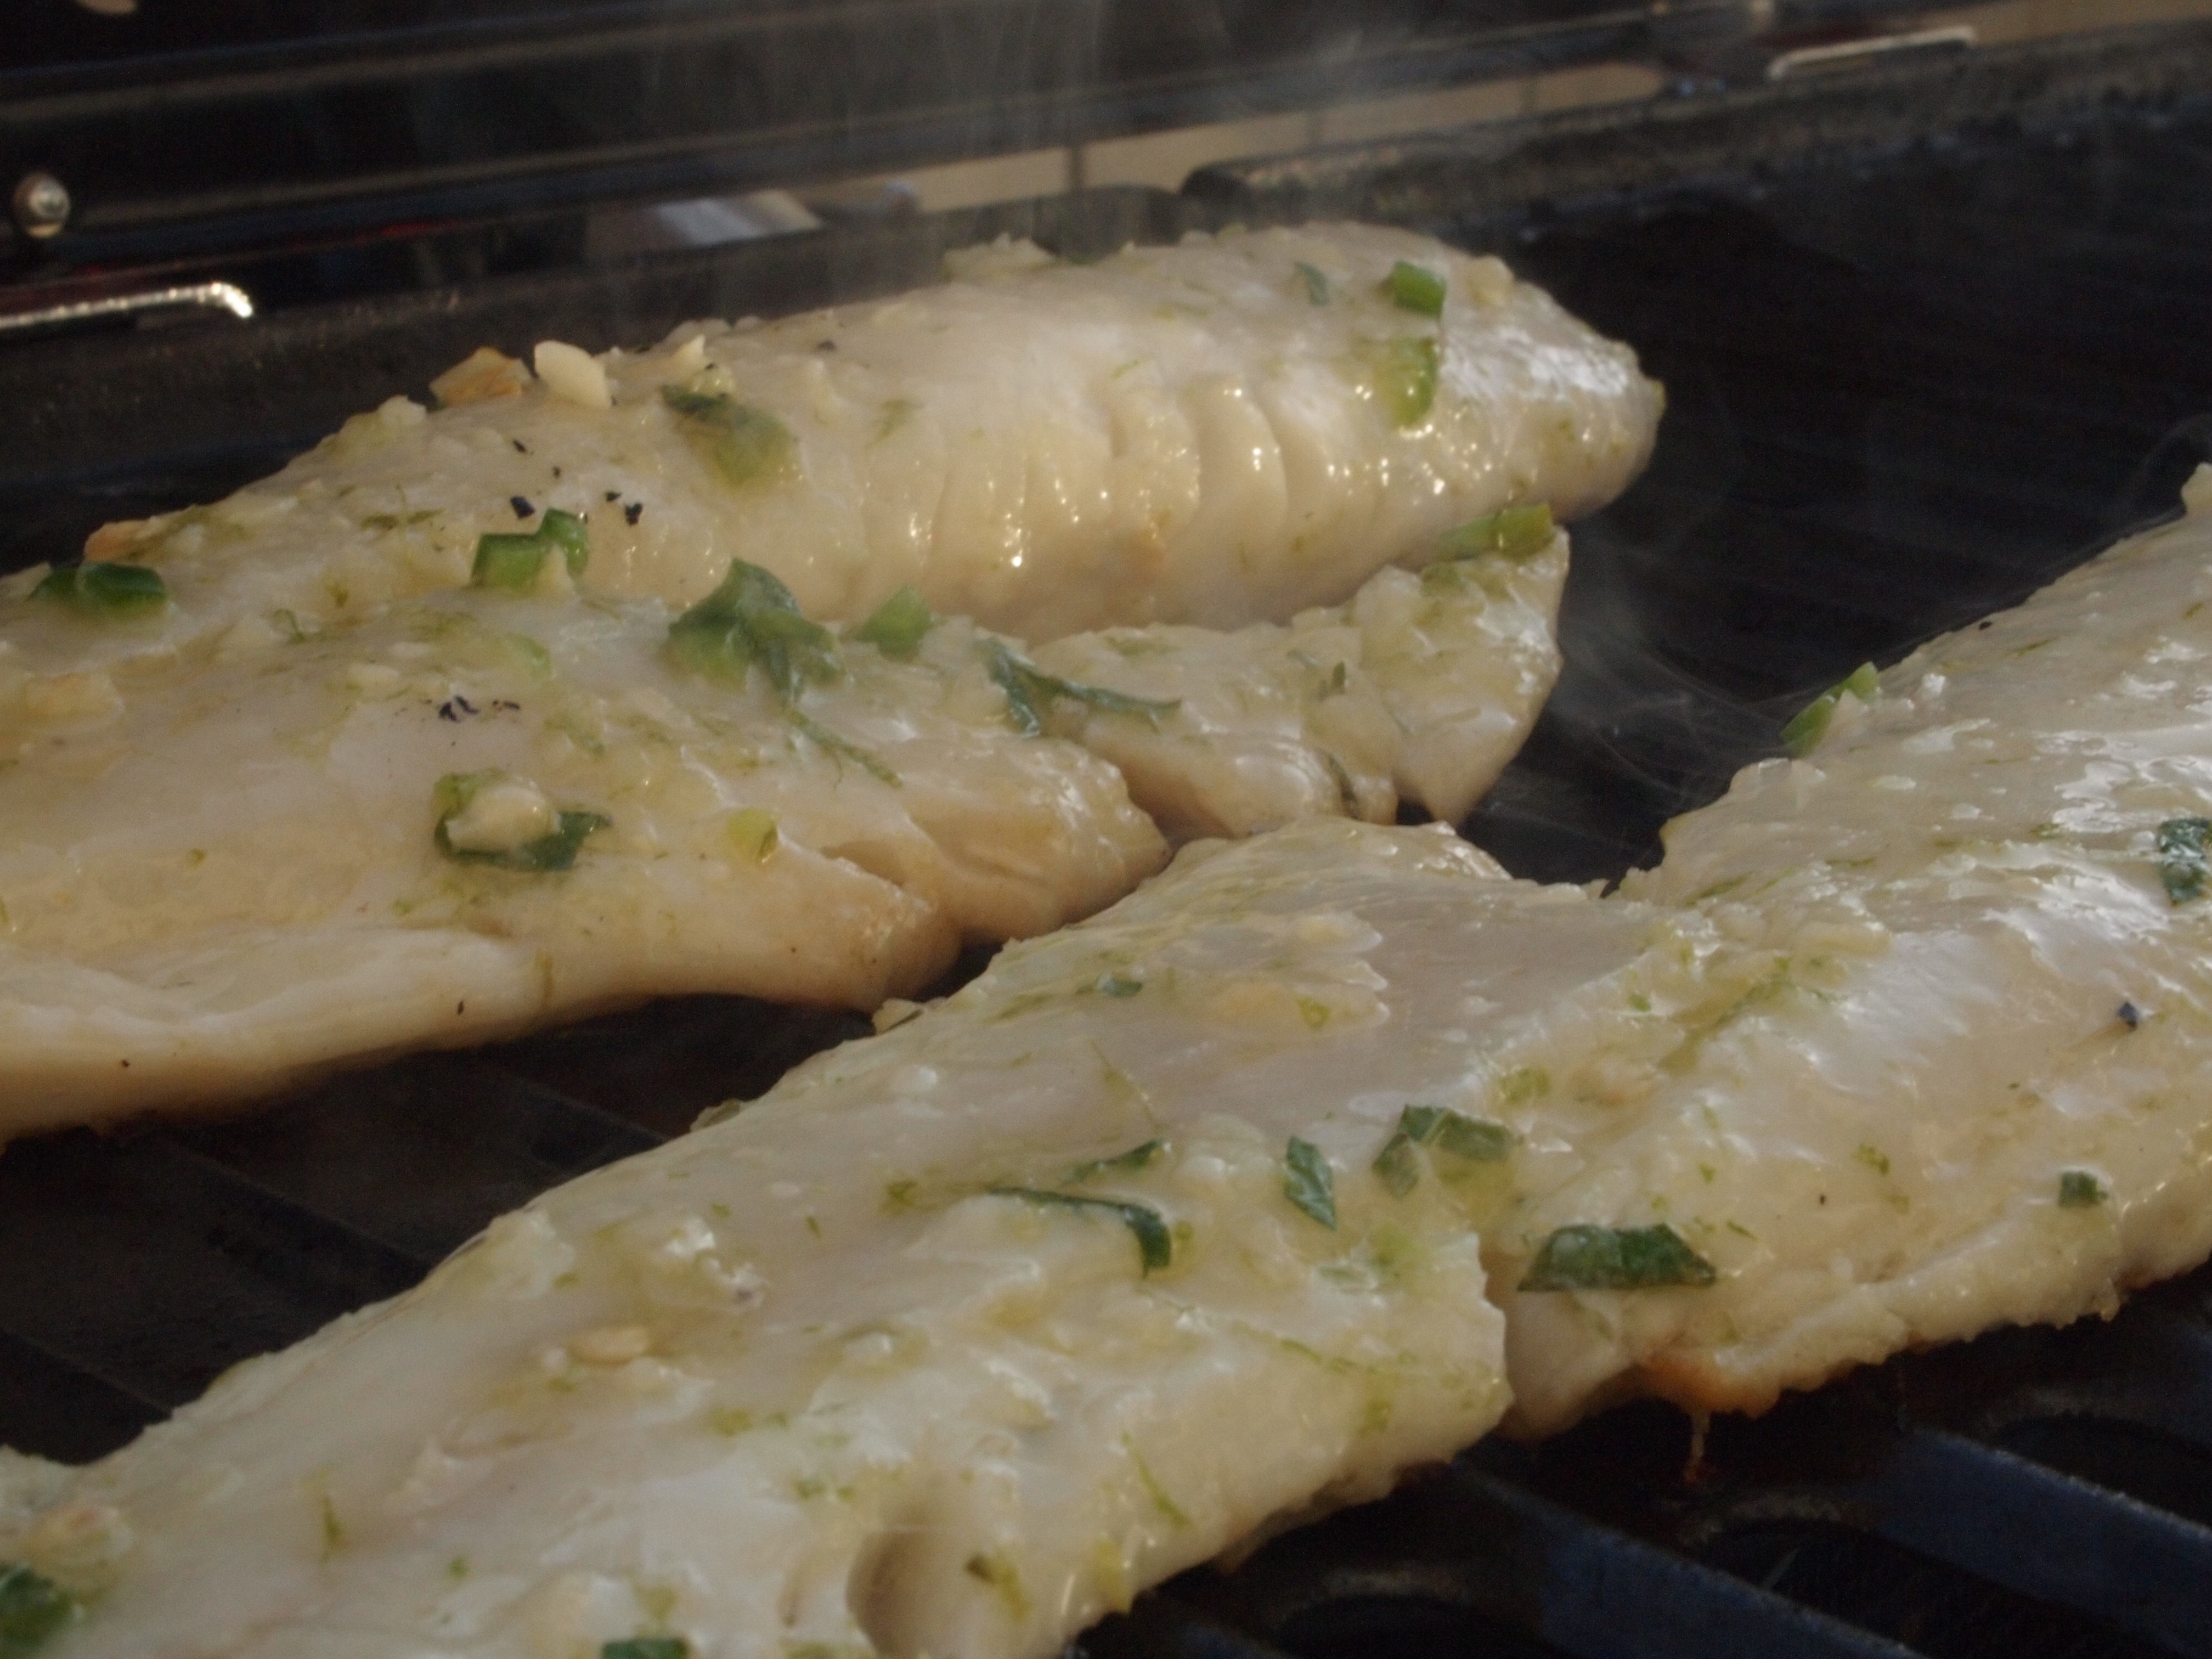
This recipe is from a couple of summers ago. I thought I would post this here to remind myself, and to share with you guys, this refreshing twist on fish tacos! I didn’t include precise measurements because I just whipped this up. Marinades are pretty forgiving, so just add everything according to your own preferences and enough to coat however much fish you’re preparing. Any firm white fish will work for this.
Margarita Fish Tacos
~1/2 jalapeño
~3 garlic cloves, mined finely (or grated)
1 lime, zested and juiced
1 shot of tequila
~1/3 cup olive oil
small handful of lemon mint, chopped
salt
2 fillets fish-whatever is your favorite taco fish (we used cod this time)
taco fixings (tortilla at the very minimum)
Finely chop the jalapeño, garlic cloves, and lemon mint. Add to a shallow dish or gallon bag. Add your lime juice, tequila, and olive oil. Season with salt to taste. Mix. Add fish. Marinate for up to 30 minutes. You don’t want to leave the fish so long that it cooks in the lime juice. Grill over medium heat until the fish is flaky and opaque. At this point, I chop any veggies I want in my tacos, add them to a foil packet, drizzle with olive oil, sprinkle with sea salt, and throw them on the grill until nice and tender. Warm your tortillas; assemble tacos!
Microplanes are so handy! Add lime rind and use it to get ultra fine pieces of garlic.
Lemon mint from the patio garden
Lime, mint, garlic, tequila, jalapeño, and olive oil marinadeMarinate fish for about 30 minutes. Flip about halfway through to make sure everything is nice and covered.Grill over medium heat until cooked!Prepare your taco fixings! Sliced red bell pepper and onions, drizzled with olive oil and sprinkled with sea salt.Assemble! We added a little bit of greek yogurt, spinach, cheddar, and avocado.
I have to start this off as a typical blog post apologizing for not posting in a while. I originally started this blog because I was working nights and needed something that I could do on my wacky schedule. Since my last post, I’ve started working a strange (better!) middle of the day shift. Lucky for you because fall is my favorite flavor season! I have so many favorites that I can’t wait to share 🙂
This recipe is one of my fall favorites. I think I’m a bit ahead of the game on this one, but as soon as I start throwing pumpkin into everything, I start craving eggnog for my morning coffee. Here’s a work approved rum free version!
Eggnog
6 cups whole milk
7 whole cloves
1 tsp cinnamon
1 1/2 tsp vanilla bean paste
12 egg yolks
1 1/2 cup white sugar
2 cups heavy cream
1 tsp-1 1/2 tsp rum extract (to taste)
Add the cinnamon, cloves, and 4 cups whole milk to a large pot. Bring to a boil over medium low heat, stirring often. Whisk the egg yolks and sugar together in a large bowl until light and fluffy. When the milk comes to a boil, add about 1 cup at a time to the egg yolk and sugar mixture while whisking vigorously to keep the eggs from cooking. Return the mixture to the pot and cook over medium heat until thickened, stirring constantly. When the mixture is thick enough to coat a spoon, remove from the heat and let cool. Once cool, stir in the heavy cream and add the remaining 2 cups of milk. Add the vanilla bean paste and rum extract. Stir and store!
This is my favorite, super easy dessert that I make when I want something that looks really fancy, but doesn’t take a lot of effort. I only make this cake during the summer when the strawberries are in season. The cake itself isn’t super sweet, so you need the berries to be ripe. I got this recipe from my Oma and it is one of the few recipes that require whisking where I refuse to use my Kitchen Aide. You do need an unusual pan called an obsttortenform. It’s similar to a tart pan, but the bottom is raised. When you flip the cake out there is a depression in the center that you can fill with fruit. I’ve seen the pan in some specialty cooking stores, but I bought mine at a German bakery. This cake is best served with some fresh whipped cream!
Lazy Daisy Cake
2 eggs
1 cup sugar
1 tsp vanilla
zest of 1 lemon
1 cup flour
1 tsp baking powder
pinch of salt
2 tsp olive oil
1/2 cup whole milk
1 packet glaze mix
Fresh strawberries
Fresh blueberries
Preheat oven to 350° F. Grease and flour your pan really well. My pan isn’t nonstick, so I lined it with foil first.
Obsttortenform! Use butter and flour to keep your cake from sticking.
Whisk the eggs, sugar, and vanilla until lightened in color and the batter falls in ribbons off the whisk.
light ribbons
Add the lemon zest. Mix the flour, baking powder, and salt in a separate bowl. Add to the egg mixture and whisk until lump free, but be careful to not over mix. Add the oil and the milk to the mixture and whisk until combined. Pour into your pan and bake for 25-30 minutes or until golden brown and the toothpick test comes out crumb free.
Nice and golden brown.
Once cool, invert pan onto a serving platter.
Right side up! Ready for fruit.
Fill the depression with fruit anyway you like! I sliced my strawberries in half and laid them in a pattern, then sprinkled a handful of blueberries on top to fill in the gaps. The goal is to cover the entire surface of the cake with fruit.
Cover ALL the cake!
Prepare your glaze, following package directions. Here’s the brand I used:
You can usually find it in the german aisle at your local grocery store.
I decided to add a couple of drops of red food coloring to make it blend with the strawberries, but that is completely optional.
Red glaze
Pour over the fruit and use a pastry brush to spread it around evenly. Work quickly! This glaze sets up super fast.
All done! So pretty!
I like serving this cake with whipped cream. You could use the stuff in the can if you were feeling ultra lazy, but that’s no fun! The secret to this whipped cream is the non-homogenized, super fresh and semi-local heavy cream I used. It came in this super cute bottle! Bonus!
High quality cream makes all the difference.
You can find vanilla bean paste at most specialty cooking shops. I love the little black specks. You can also split a vanilla bean in half and use the seeds, or use high quality vanilla extract in a pinch.
Fresh Whipped Cream
16 oz heavy cream
1/2 cup granulated sugar
1 tsp vanilla bean paste
Add the heavy cream to your mixing bowl. Start mixing on medium speed. Slowly sprinkle in the granulated sugar while the mixer is running. Feel free to add more or less sugar to taste. Whip until stiff peaks form. Add the vanilla bean taste and let mix for a few more seconds to combine. Done!
Delicious. I was dunking strawberries in it and just eating gobs of this stuff.
This is one of those desserts where the end product looks like it took way more effort than it actually did. Love it!
Today is grey and rainy, so I figured I would relive the sunshine of two weekends ago by posting a delicious meal I had. My dad used to go diving every weekend when we lived in Hawaii, so I ate a lot of fresh seafood as a kid. If you’ve never had it, then you should give it a try. It has a really lovely bold, briny flavor. I didn’t want to mask the naturally amazing flavor of the sea bass, so I seasoned it simply with some sea salt and fresh ground pepper and served it with a tomato and mango salsa. I grilled some zucchini and made a simple german style potato salad on the side. Add some local, organic mixed greens for a nice side salad and you’ve got a nicely rounded dinner.
Grilled Sea Bass and Zucchini with a Tomato/Mango Salsa
The fillets didn’t have skin, so I put them on foil to keep them from falling apart.
Season the fillet with sea salt and ground pepper. Lightly drizzle with some olive oil and put on your preheated grill. This fish has tons of flavor and doesn’t need a lot of help to shine. My fillet did not have skin, so we cooked it on foil. If you’ve ever tried cooking a skinless fillet on a grill, you know why. Lower the lid and cook until done! The fish will turn opaque and will easily flake apart when it is done.
For the zucchini, slice about 1/8-1/4 inch thick with a mandolin the long way. You can use a knife, or cut rounds, it just may take you a little longer. Give it the same treatment as the sea bass. Sprinkle with salt and pepper and drizzle with olive oil. Cook over medium heat 2-3 minutes per side.
Beautiful grill marks!
Tomato Mango Salsa
1 cup cherry tomatos, cut into halves or fourths depending on size
1 large, sweet Mango, diced
3 Tbsp olive oil
1 clove garlic, finely chopped
2 tsp red pepper flakes
1 Tbsp balsamic vinegar
4 mint leaves
Add the garlic and pepper flakes to the olive oil in a small pan and heat gently over low heat until the garlic starts to sizzle. Don’t let the garlic brown. Turn off the heat and let cool. Whisk the balsamic vinegar into the olive oil mixture to get a nice emulsion. Toss the mangos and tomatoes together and season with salt.
Sweet and Spicy
Add a spoonful of the oil/vinegar dressing and toss to coat. Taste! Add more of the vinaigrette, to taste. It will add a nice heat to the salsa. Chiffonade the mint leaves and add.
So colorful!
Yummm! This was one of my favorite meals in a long time. The sea bass was AMAZING! The fish monger told us that a big fillet was only one serving, maybe two. It seemed ridiculous until I tasted the fish. My friends and I ate so much that we only had a little bit of leftovers for the next day!
Yesterday was another gorgeous day in the Pacific Northwest!
It matches my Kitchen Aid!
What better way to break in the grill than to throw a couple of burgers on it? It was feeling like a mushroom sort of day, so we went out and got ourselves a couple of nice, big portobello caps. I really like portobello mushrooms. Some people get really excited about steaks for the same reasons that I get excited about portobellos. They’re juicy, meaty, and the charred bits are the best! These are also infinitely more delicious than a boca burger, and almost as easy.
Grilled Portobello Burgers
2 large portobello mushroom caps
1 large clove of garlic (or to taste)
2 generous pinches kosher salt
1 Tbsp fresh rosemary, chopped
1/2 Tbsp fresh thyme, chopped
1 1/2 Tbsp balsamic vinegar
1 1/2 Tbsp olive oil
Fresh ground pepper (to taste)
Clean your mushroom caps with a damp cloth and remove the stems my gently twisting. Be careful and don’t break them in half like I accidentally did.
Ready to go!
Finely chop the garlic. Sprinkle your salt onto your chopped garlic and chop some more. I like to give it a good smash with the blade of my knife, so the garlic is almost a paste.
Harvesting rosemary from the patio
Finely chop your herbs. I used fresh rosemary and thyme because I have a couple of flourishing plants living on my patio. Feel free to substitute your own favorite fresh herbs, or a couple of pinches of whatever dry herbs you have on hand. You’ll want to use less if you’re using dried herbs.
Mix together the balsamic vinegar and olive oil in a shallow dish that is large enough for the mushrooms to lie flat on. Since I broke one of them, the pie plate worked fine. Side note: My favorite balsamic vinegar comes from this little shop down on St. Helens Ave. in Tacoma. They make their own and it is awesome!
From Stink!
Add your garlic and herbs to the balsamic vinegar and olive oil mixture. Grind some black pepper over the whole concoction and then place the mushrooms gills side down into the mixture.
Gills side down!
Spoon some of the marinade over the top. Let it marinate for at least 30 minutes, an hour is better.
Soaking up all the deliciousness
Preheat your grill and oil the grates. I like to spoon some marinade into the gills (really get it saturated) and over the top right before throwing it on.
Again, gills side down
Cook for about 5-8 minutes or until you can see the edges start to curl and the mushrooms shrink a bit. Flip and cook for another five minutes. The texture should be still firm, but less crunchy (like a raw mushroom), more….squishy, for lack of a better word. You don’t want to overcook it to mush.
Toast your buns in the last couple of minutes.
Toast the buns!
Once you flip the mushrooms, add sliced cheese and close the lid on the girl for a minute or until the cheese is all melty.
Cheesy Mushrooms
I fried up a couple of eggs and threw them on top since this ended up being breakfast for me, along with some tomato and avocado.
Breakfast burger?
Look at this finished masterpiece! It was delicious.
It feels like summer! Even though Washington is famous for sprinkles, it is the most beautiful place on earth when it’s sunny out.
My absolute favorite thing about the summers in Washington are the fresh berries! I LOVE summer berries, and it is always quite the accomplishment when I actually make something with them instead of just eating them all straight from the carton!
Fresh strawberries to top my Greek yogurt!
YUM!
I’m pretty proud to report that I managed to shared the wealth of berries with a group of friends. I invited a few over for a breakfast of french toast, a warm mixed summer berry sauce, and framboise mimosas! I didn’t take any pictures of the finished meal 😦 I’m still getting used to documenting my culinary adventures! I did, however, take a couple pictures of the berry sauce, so that’s what I’m going to share with you today!
I do realize that there is rhubarb in this recipe, and that rhubarb is not actually a berry. It was my first time using rhubarb in anything! We spooned this sauce over some vanilla ice cream the night before and it was amaaaazing!
Mixed Summer Berry Sauce
2 cups chopped strawberries (quartered is fine)
1 1/2 cups blueberries, divided
2 cups raspberries, divided
2 stalks rhubarb, cut into 1/2″ pieces
4 Tbsp framboise
1/2 cup brown sugar
1/2 cup white sugar
1/2 cup orange juice
In a big sauce pot, mix the strawberries, 3/4 cup blueberries, 1 cup raspberries, and the rhubarb. Toss to coat with both sugars and add the orange juice. It seems like a lot of sugar, but the rhubarb is incredibly sour. You may need more or less depending on how sweet your berries are.
Throw it all in a pot!
Cook over medium/low heat, stirring occasionally. The berries are going to release a lot of liquid. Keep cooking, stirring occasionally, until the berries are cooked down and the whole thing has a syrup-y consistency.
Already looks delicious!
Turn off the heat, and add the reserved berries. You want these to stay relatively raw to give the sauce texture. Stir in the frambroise. Done! Serve warm over anything and everything that goes well with fruit. If you want a really thick consistency, you could whisk together about 3 TBSP cornstarch with equal parts water and pour it in before adding the rest of the berries, while it is still on the heat. I will warn you that it does create a opaque appearance in the sauce that is not as lovely.
I LOVE caramelized onions. I can’t eat raw onions without gagging, but I will gladly throw some caramelized onions onto some pita bread and eat as is. I recently ordered an omelette at a local restaurant (ahem…Masa..ahemmm) and had the unfortunate experience of finding out that their idea of caramelized onions resembled a soggy mass of wilted shoelaces more than the sweet, rich, jam of the gods I was expecting. It was disappointing. I was crushed. Le sigh… Let me show you how I mastered the art of caramelizing onions, so you can be everybody’s favorite person too.
Caramelized Onions
1 1/2 TBSP oil
2 large, sweet onions
3 generous pinches of kosher salt
1/4 tsp fresh thyme (optional!)
3 TBSP white wine
Heat oil in a large pan over medium heat. Slice onions thinly, about 1/4″. It doesn’t need to be exact, but the scientist in me feels the need to give you some concrete numbers, so you know what you’re aiming for.
Onions, thinly sliced
You will have a giant pile of onions, but it cooks down a lot. You will see. Throw the onion slices in the pan and give it a stir to distribute the oil. Sprinkle with the salt and cover.
I like to cover the pan to get everything cooked down before it starts to brown. This also traps in the moisture and keeps the onions from burning and sticking before I’m ready for it. Let the onions cook, covered, for about 20 minutes. Uncover and add the thyme at this time (ha!) and stir. Leave uncovered and let cook, stirring occasionally, until you see some color starting to form.
Starting to brown
When things start to stick and you’ve got some decent caramelization action going, add the white wine and stir. Be sure to scrape up the brown bits on the bottom of the pan. Cook until the wine is absorbed and the onions are a delicious golden color. Taste. Be amazed.